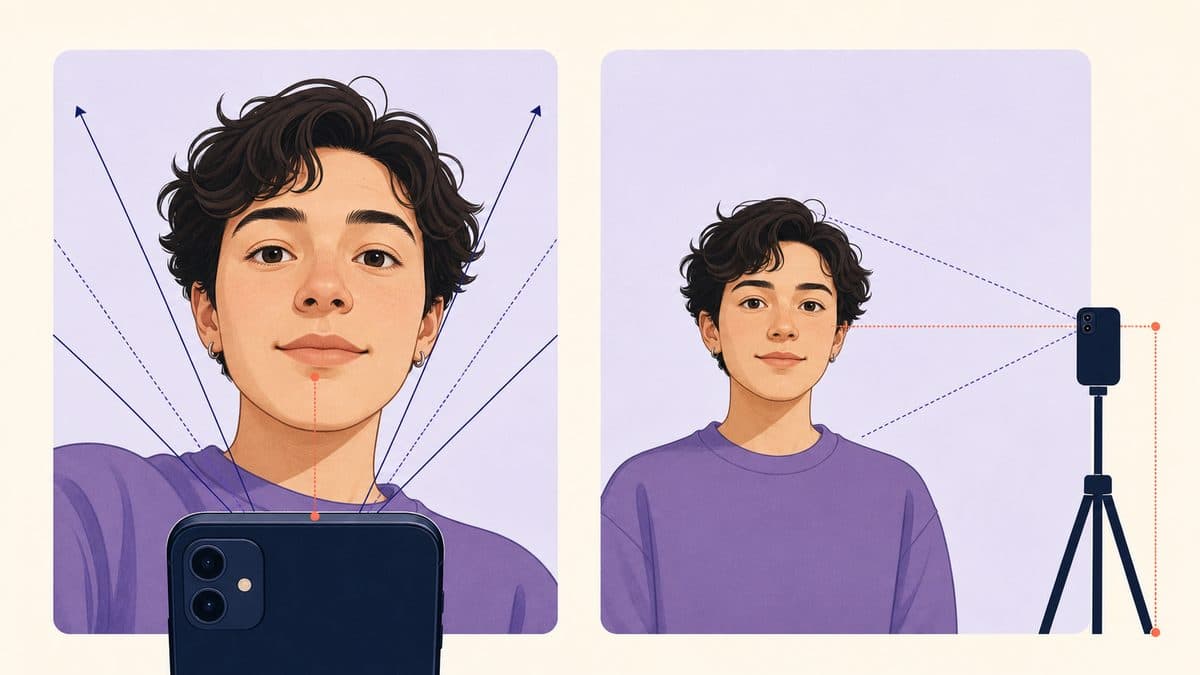
Why a close camera changes facial proportions
A photograph turns a three-dimensional face into a flat image. When the camera is very close, the nose, lips, and central cheeks are meaningfully nearer to the lens than the ears and outer jaw. They therefore occupy more of the frame relative to the sides.
This is perspective, not a flaw unique to one phone. A wider front-camera view encourages close framing, which makes the effect more noticeable. Software correction can adjust parts of the image, but it cannot make every close selfie equivalent to a portrait taken from farther away.
Camera distance matters more than the phone model
Moving the phone farther away reduces the relative distance difference between central and outer facial features. As a practical starting point, place the camera several feet away, keep the full face large enough to inspect, and crop afterward if needed.
If the phone offers optical zoom from a longer lens, a modest setting can help fill the frame from a comfortable distance. Avoid strong digital zoom that removes detail needed to see the jaw and face edges.
Wide-angle front lenses encourage distortion
Many front cameras capture a wide field of view so an arm's-length selfie includes more of the scene. The wide view is not automatically inaccurate, but using it from close range exaggerates perspective. Group-selfie modes and edge corrections may also stretch areas near the frame boundary.
Keep the face near the centre, avoid ultra-wide modes, and compare results only when the distance and lens setting are similar.
Camera height changes the visible taper
A high camera looks down toward the face. The upper face is closer to the lens, while the chin can look smaller and farther away. This may create a stronger heart-like taper. A low camera can emphasize the jaw, chin, and underside of the lower face.
Place the lens close to eye level. Check the phone itself rather than looking at your image on the screen, which can cause the eyes and head to angle downward.
Head tilt and turn hide the true width relationship
Tilting one ear toward a shoulder rotates the vertical axis and changes how face length is measured. Turning creates a three-quarter view: the nearer cheek and jaw appear larger, while part of the far outline disappears.
Use visible ear height and the eye line as rough alignment checks. Small natural asymmetries are normal; the goal is simply to avoid adding a strong pose difference.
Close photo versus distant photo
| Setup | Close handheld selfie | Distant eye-level photo |
|---|---|---|
| Perspective | Stronger centre-to-edge size difference | More even facial proportions |
| Alignment | Often above or below eye level | Easier to keep level on a support |
| Pose | Arm position may turn or tilt the head | Timer allows a relaxed straight pose |
| Face edges | Jaw may sit near a distorted frame edge | Face can remain centred with space around it |
| Best use | Casual snapshot | Manual comparison or detector input |
A better photo setup
Set the scene
- Use soft, even light from in front of you.
- Clean the lens and remove beauty or reshaping filters.
- Place the phone on a stable support at eye height.
Set the distance
- Stand several feet away.
- Keep the face centred and leave a little space around the hair and chin.
- Use modest optical zoom or crop after capture if needed.
Set the pose
- Look into the lens.
- Keep both ears at a similar height and the nose centred.
- Relax the jaw and use a neutral expression.
- Pull hair away from the cheeks and jaw.
Practical checklist before analysis
- One face is visible and large enough in the frame.
- The lens is at eye level, not above the forehead or below the chin.
- The head is straight rather than tilted or turned.
- The complete chin, cheeks, jaw, and visible upper face are clear.
- Light is even and the image is not blurred.
- No portrait filter reshapes facial features.
- The camera is farther away than a normal arm's-length selfie.
How to use the improved photo
Use the manual measurement guide to compare length, maximum width, cheek width, and jaw width from the same image. Then try the detector, which processes the photo in the current browser and does not upload or store it.
If two controlled photos still produce neighbouring matches, read why face-shape results change and consider that your proportions may genuinely sit between categories. The face-shape library can help you compare the specific features involved.
Frequently asked questions
Does a phone camera permanently change my face shape?
No. It changes the two-dimensional image of the face. Your physical proportions have not changed.
Is the rear camera always more accurate?
Not automatically. Rear cameras may offer better detail or longer lens options, but distance, height, centring, and pose still matter most.
Should I use portrait mode?
You can if it does not apply face reshaping and keeps the facial edges clear. For a simple comparison, a normal photo mode avoids extra processing and artificial blur near the outline.
How far away should the camera be?
Use several feet of distance when practical, then crop or use modest optical zoom. The goal is to avoid filling the frame by moving a wide lens very close.
Why do I look different in the mirror?
A mirror provides a live reversed view at a different distance, while a photo freezes one lens, angle, expression, and moment. Familiarity with the reversed image also affects perception.